Reveal.js Tutorial
In this tutorial we will create a presentation by constructing everything from scratch: HTML, CSS, Markdown and JavaScript. Before we start the tutorial it is useful to have a quickly go through the main elements of web-page building.
1 Crash-course
These cheat-sheets have been built from resources available on CodeAcademy and the Mozilla Developer Network which are also recommended for more in-depth training and resources. An excellent online book is also available on http://eloquentjavascript.net/.
We decided that the quickest way to approach this is to provide commented samples so we can quickly build a simple web-page.
1.1 HTML
HTML (HyperText Markup Language is used by browsers to communicate with each other and display data in an attractive fashion. It has a tree-like structure similar to that of XML. Each branch defines a section of a web page is started by some text in brackets <branch> and ends with a backward slash and the text <\branch>. Some objects are added in self-stopping branches by using a forward slash before closing the bracket <branch/>
| Both do the same thing. Only the first is necessary in HTML v≥ 4 | |
| The branch specifies information that is first read by the browser to correctly display the page. This is where JavaScript source files and CSS files are conventionally imported. It normally contains other information such as tags/titles/authors/etc used by search engines | |
| This is the part where the data goes that is displayed to the user. | |
| <h1>Amazing Presentations Ltd.</h1> | Display text using heading 1 |
| <div class="wow"> | Create a page division with special display properties. |
| <h2>Amazing discovery.</h2> | |
| <p>Something that changes the world.</p>1.2 | Use paragraph formatting |
| <a href="otherPageLoc.html">Lookie here.</a> | Create a link |
| </div> | |
| <p id = "footer">©NGCM Ltd.</p> | |
| Usually after the body section some more scripts are added to process the HTML data |
1.2 CSS
CSS or Cascading Style Sheets are commonly used in web applications to standardise formatting and styles. It is also used in reveal.js to set-up a presentation template.
| Specifies the general layout of the page. | |
| Set the font size of text inside <p></p> | |
| Specify properties of a page division, i.e. a <div> part of a page that should have special properties (e.g. a background image) | |
| Inside a division it might be necessary to want to change the way a link is formatted (the <a> inside a <div>. | |
| If a specific paragraph’s has to be formatted differently (e.g. change only the colour) you can give it an ID and set it up here. | |
1.3 JavaScript
HTML contains static content and JavaScript is the way by which a web-page becomes dynamic. This is a scripting language that is interpreted by your browser and it is able to do what most programming languages do: mathematical operations, run loops, functions and create objects. The most important difference between JS and other languages is the way in which objects are defined (1), which is similar to the way in which any variable is defined (2). Functions are defined by calling a function ’constructor’ that is assigned to a variable name with a set of inputs (2). The for-loop (4) and if-statement (3) syntax is similar to that of other languages. It is important to note that while a ’;’ is not necessary in normal program flow, it is strongly recommended especially inside functions, loops and flow control statements.
JavaScript is completely different from Java
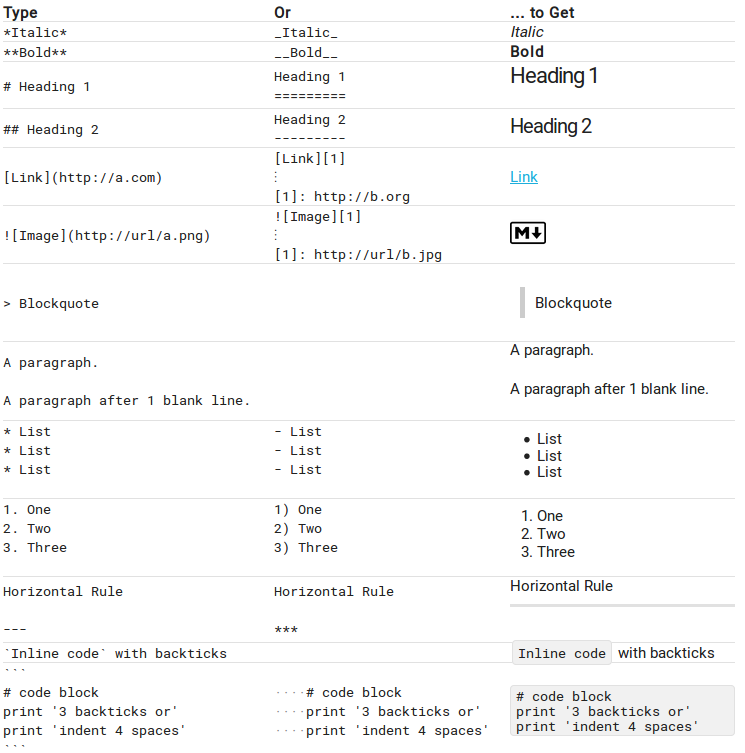
1.4 Markdown
Markdown is very useful for writing content for web-pages books and other types of documents. The language is similar to LATEXin the sense that it uses plain text to write the source for a nicely formatted document, but it has the advantage of having very human-readable source code. The best way to write markdown is to use a specialised editor such as Atom, but in this tutorial we will use Brackets with a plugin for MD live generation. Markdown is so simple that an actual tutorial is not required for the basics and the cheat-sheet below should prove sufficient (for a step-by-step 10 minute tutorial check http://commonmark.org/help/tutorial/ ):
2 Tutorial
The tutorial exercise is to create a presentation by yourself from the bottom-up. 1
- Start with the basic HTML structure, i.e. the <html> tags with <head>, <body>, etc.
- Add the reveal.js stylesheet and your own in the ¡head¿ branch.
- Add the reveal <div> and inside it the slides <div>
- Add about five sections inside the slides <div>
- Create two JavaScript sections to call reveal.js and head.min.js (this is needed so that it works in all browsers),found in ./reveal.js/js/ and ./reveal.js/lib/js/, respectively.
- After the <slides> section add a new <script> section to initialise the presentation with the following add-ons:
Reveal.initialize({
controls: true, // Display controls in the bottom right corer
history: true, // Push each slide change to the browser history
center: true, // Vertical centering of slides
transition: ’convex’, // none/fade/slide/convex/concave/zooms
// Optional reveal.js plugins
dependencies: [// Markdown Support
{src: ’./reveal.js/plugin/markdown/marked.js’
, condition: function () {
return !!document.querySelector(’[data-markdown]’);
}
}, {src: ’./reveal.js/plugin/markdown/markdown.js’
, condition: function () {
return !!document.querySelector(’[data-markdown]’);
}
} , // Slide Zooming {
src: ’./reveal.js/plugin/zoom-js/zoom.js’
, async: true
}]
}); - Now go back to the <slides> branch and start adding slides:
- 1 HTML slide
- 1 Markdown slide written in the HTML file
- 1 Markdown slide that is imported from an .md slide.
- a section of slides (so you can go downwards): one with an image and one with a video
For the quick:
- Create a slide with a table.
- Create a CSS file to look similar to the university .ppt template.
- Include plotfile.js in your presentation and modify it to create a 2D parabola.