This entry is to accompany the module 'Advance Computational Methods Part II'. The aim is to firstly walk through how to install Sublime Text 2 (ST2) on your Linux operating system and then demonstrate the mighty power of this text editor and how to tweak it to your personal needs - for this example we will focus on writing a .rst file for a Pelican Blog entry. This is a follow-on from a previous FEEG6003 pelican tutorial lead by Denis Kramer, however all the ideas presented here should be transferable to other projects. Exercises are split and labelled, and those following the module presentation should stop when each exercise is complete ready for the next part of the presentation. Let's begin.
- Note
- To be able to work through this tutorial efficiently we recommend you are running the virtual machine appliance (feeg6003_TextEditors.ova file) supplied for this tutorial from this repository. Brief Reminder: In Virtual Box this involves clicking File > Import Appliance... and select the .ova, continue and check settings, then click Import. It is also useful to allow copy and paste between host and guest by installing guest additions through Devices > Insert Guest Additions, then in a terminal window on the guest machine navigate to /media/feeg6003/VBOXADDITIONS... and enter
$ sudo sh ./VBoxLinuxAdditions.run
- and finally in Virtual Box Manager select this virtual appliance, go to Settings > General > Advanced and change "Shared Clipboard" and "Drag'n'drop" settings to bidirectional.
Exercise 1: Installing Sublime
Sublime Text 2 offers a free and untimed trial version of the software which we will use for this tutorial - this provides full functionality, however a license should be purchased for continued use (users will be prompted with a reminder of this after a certain number of saves). To install the free version, firstly open up terminal on your machine and enter these commands (alternatively found here):
$ cd ~
$ sudo add-apt-repository ppa:webupd8team/sublime-text-2
$ sudo apt-get update
$ sudo apt-get install sublime-text
This will download the package and install it under /opt/sublime_text_2. It will also create two symbolic links: subl and sublime-text which can be called in terminal to open ST2. If you wish to make your own you can do the following (in this case the symbolic link is set to be sublime):
$ sudo ln -s /opt/sublime_text_2/sublime_text /bin/sublime
NOTE: if you try to run ST2 from the terminal a ST2 window will open and be fully functional, however this will clog up the current terminal window due to a bug within GLib (I haven't found a fix for this as of yet). To carry on using the terminal you will need to open a new terminal tab or window. The error presents itself as shown below and will keep producing errors until you hit ctrl + c . But, upon doing this the sublime session you opened will shut down.
$ sublime-text

(sublime: 6476): GLib-CRITICAL **; Source ID 1982 was not found when attempting to remove it.
First look at Sublime Text 2
Once you have opened ST2 you will be presented with a window similar to that shown in Figure 1.
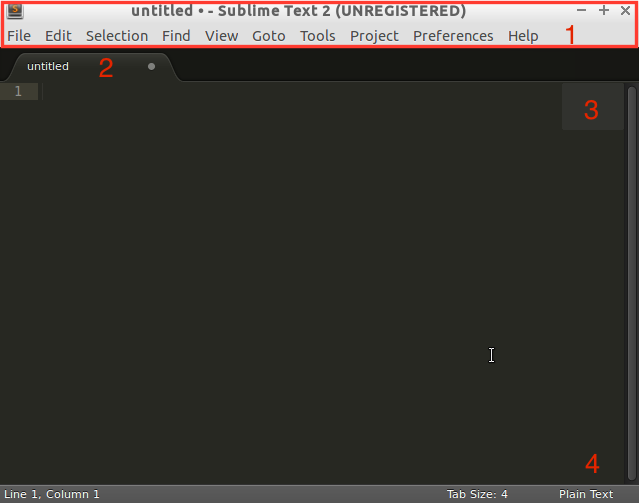
The red numbers on the image are described below:
- The taskbar. Here you should be able to access all the options for ST2. It is worth noting that all the menus/options are also accessible via the Command Palette which will be introduced later.
- File tabs. Along this bar will be all the open files in that window/pane. You can either navigate through them by clicking on them or use the keys alt + # to move to the # file (where # is the number of the file from the left).
- Overview pane (minimap). As you populate your file this will give you a zoomed-out view which can be useful for navigating through large files.
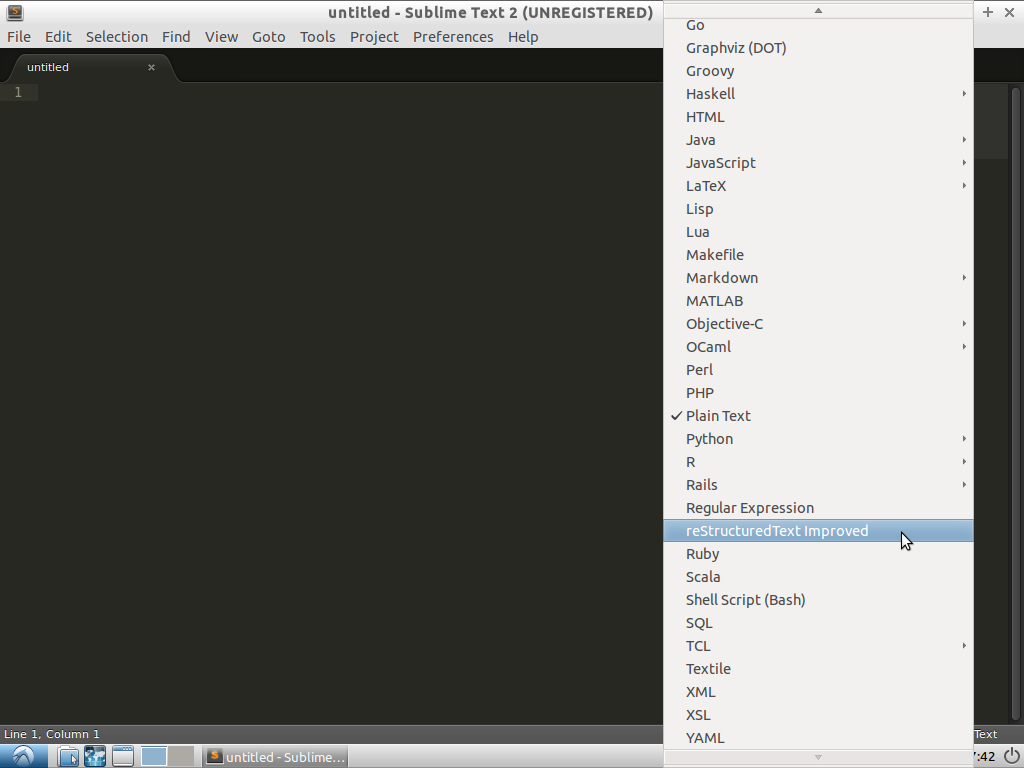
- File syntax. This shows you what the syntax the file is being displayed in. ST2 will automatically select a syntax based on the file extension (e.g. if the file is .py then ST2 will choose Python). However if you want to change this then you can click on the writing and select your required syntax from the list. This is also achievable through the Command Palette.
There are many useful tools within ST2 and the following sections aim to give you an insight into those we find most valuable.
Built-in Goodies
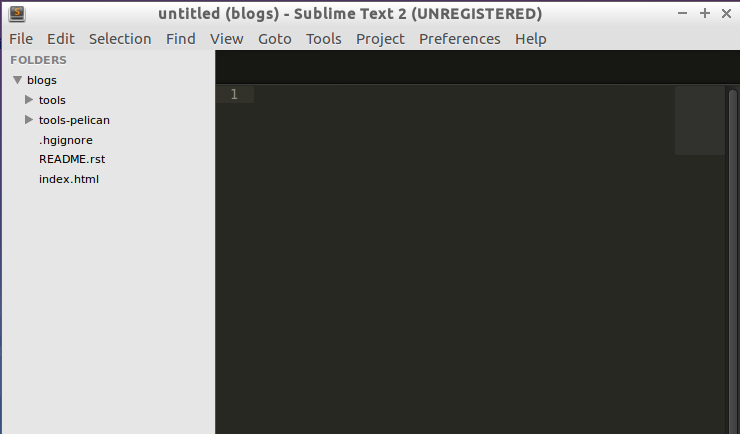
"Projects" are one of the more useful features of ST2. This feature allows entire folders and their contents to be displayed in the side bar. This gives the user the ability to not only switch quickly between files in a number of directories, but also see what other files exist in the project at all times as in Figure 2. To do this, go to File > Open Folder and select a folder (Advanced Computational Methods Part II students, open ~/comp_mod/blogs). Additional folders can be added to the workspace, and the project can then be saved for another session under the Project tab.
While using ST2, you will notice the smart autocomplete pop-up. This is another handy gadget which works out of the box, and will suggest possible completions for a word you are typing based on similar words in the file, keywords for the file syntax etc.
In addition to these, "Snippets" and "Build Systems" are a powerful way to increase text-editing efficiency, and will be introduced once a few more packages are installed so that we can customise them for our blog entries.
Install Package Control
Package control is the Sublime Text package manager that makes it exceedingly simple to find, install and keep packages up-to-date.
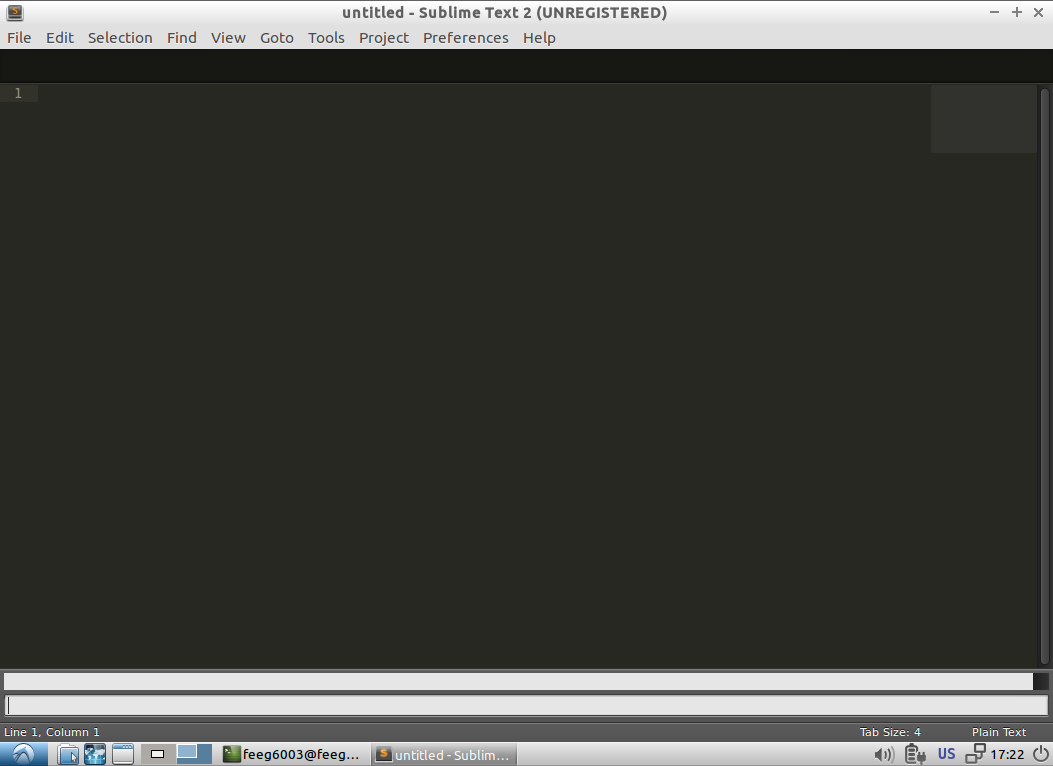
To get package control in ST2, firstly open ST2 and either push the keys ctrl + ' (if you are working on a Virtual Machine, the Keyboard setup may not be the same as your host's - on a MacBook Air, the key ' was actually the § key above tab). Alternatively go to View > Show Console . By doing this a white box at the bottom of your Sublime window should open as shown in Figure 3.
Now follow this link and copy the code provided. Return to the ST2 window and paste the code into the console (i.e. the white box) and then hit return. This will install package control. You may be required to restart ST2 a couple of times depending on what is already installed on your machine.
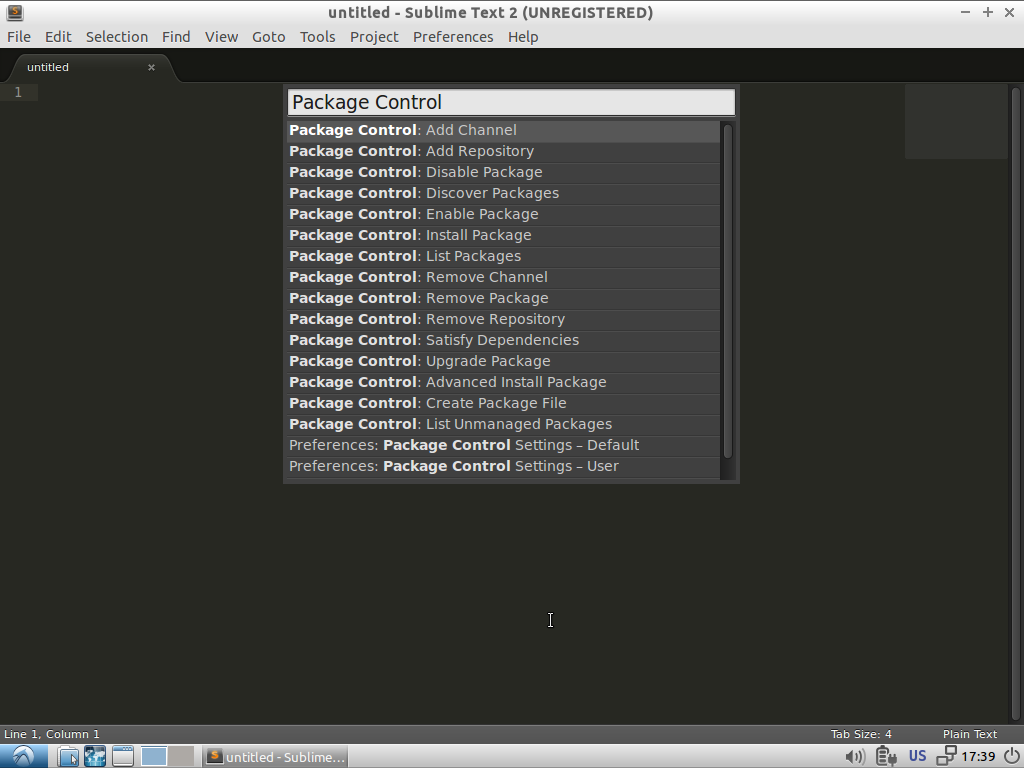
An easy way to verify if package control is installed is to open the Command Palette with ctrl + shift + p or going to Tools > Command Palette... . The Command Palette is a way to search ST2 for packages, syntax, snippets, ... in other words it is your best friend in ST2! It uses a search method called fuzzy search which allows the user to type keywords only partially and returns the closest matches, making it easy to find tools without needing to remember the exact name and wording. With the Command Palette open, start typing Package Control. This should present you with all options available with regards to Package Control (this is how you will make use of Package Control later).
An alternative method to check if it is fully installed is to go to Preferences and you should see Package Control at the bottom of the list. By clicking on this it will open the Command Palette as described in the above paragraph. However, we thoroughly recommend learning the important key bindings such as ctrl + shift + p to open the Command Palette as removing the need of the mouse to navigate will make your use of ST2 much more efficient.
Installing a Package
We are going to install a package that improves the syntax of reStructuredText in ST2.
To install a package we need to open the Command Palette (with ctrl + shift + p ) and type in Package Control: Install Package and select that entry (remember it is a fuzzy search so you don't need to type it all in). Now you are presented with a list of all the packages available to install via Package Control. Start typing RestructuredText Improved and select the entry that has the description: "Improved Syntax Highlighting for RestructuredText." This will download and install the package and should be functional immediately - this may seem strange and wonderful to users of other text editors whereby restarting the editor is the only method of invoking new tools.
To check, click in the bottom right-hand corner where the file syntax is displayed and see if there is one for reStructuredText Improved. If so you have successfully installed the package.
There are many other useful packages available through Package Control but we just wanted to demonstrate how easy it is to install one! If your ideal package/tool does not exist however, then we need to learn to tweak ST2. Below are two ways to personalise ST2 for your own use: snippets and build systems.
Exercise 2: Snippets
A snippet is best described as a smart template that will insert text for you and adapt it to its context. Snippets are very useful for short fragments of text that you use over and over again. A simple example is the "lorem" snippet that comes with ST2. In a new file type lorem followed by hitting the tab key. This snippet will replace the single word "lorem" with the Lorem ipsum filler text.
It is possible to see all the snippets available for that document format by either going to Tools > Snippets or by using the Command Palette. In here start typing snippet. A list should appear as shown in Figure 6. Try changing the syntax (Figure 1, point 4) to your favourite language and explore the built-in snippets!
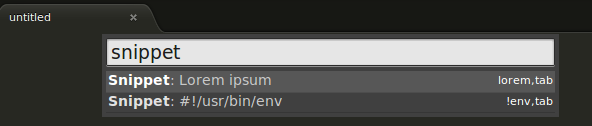
The first item in the list titled "Lorem ipsum" is the example we just used. Note that the short-cut to the snippet is displayed on the right as lorem,tab i.e. you can use the snippet as we did earlier: type lorem and hit tab . We are now going to make our own snippet.
New Snippet...
This example builds on what was taught in the "Introduction to Pelican" session. During that session we learnt to write a blog entry in .rst format. However, each time you start a new blog you have to firstly remember all the important metadata attributes and format them correctly. Therefore, to increase our efficiency we will build a snippet to do this for us.
Firstly, it best to have a file with the extension that you want to build the snippet for open in ST2. This allows you to find the scope needed for the snippet and allows you to test it. On the virtual appliance we have supplied for the module, create a directory called my-blog under the path ~/comp_mod/blogs/tools-pelican/content/ then open a new file and save as blog-entry.rst in the my-blog directory so we can use it throughout this workshop. Note: This can be done quickly with ctrl + n , then ctrl + s and use the file-save GUI.
To build a new snippet we need to go to Tools > New Snippet... which will open a new file with the following code pre-entered:
1 <snippet>
2 <content><![CDATA[
3 Hello, ${1:this} is a ${2:snippet}.
4 ]]></content>
5     <!-- Optional: Set a tabTrigger to define how to trigger the snippet -->
6     <!-- <tabTrigger>hello</tabTrigger> -->
7     <!-- Optional: Set a scope to limit where the snippet will trigger -->
8     <!-- <scope>source.python</scope> -->
9 </snippet>
There are three main lines of interest here:
- Line 3
- This area (between the [ ] opened at the end of line 2 and closed on line 4) is the text that gets pasted into the file when you create the snippet. We will look at the format in a bit.
- Line 6
- The code <tabTrigger>hello</tabTrigger> is where you define the tab-trigger to use the snippet.
- Line 8
- The code <scope>source.python</scope> is where you define what file format you can apply the snippet.
We will firstly define the tab-trigger and the scope so that we can use it our file blog-entry.rst. As the snippet will be creating the title and metadata a sensible tab-trigger would be title so replace line 6 with the following (note: to uncomment/comment lines push ctrl + / ):
6 <tabTrigger>title</tabTrigger>
Next, cycle back to the .rst file and push ctrl + shift + alt + p to show the scope in the status bar at the bottom of the window, see Figure 7.

Copy text.restructuredtext into line 8 so that it reads:
8 <scope>text.restructuredtext</scope>
Now we can start looking at the body of the snippet. Currently we have: Hello, ${1:this} is a ${2:snippet}.. This contains two tab key markers which allow you to cycle through the fields that you wish to enter each time you use the snippet. The tab key markers are denoted by the $ sign, and the number that follows it in the curly brace defines the cycle order (i.e. when you press tab ). You can repeat the number if you want to fill in two fields with the same information. The word that follows the colon is the field text that you will replace when you start typing.
For our "blog title" snippet we will input the following for the content:
<snippet>
    <content><![CDATA[
${1:Title}
####${2:#}

:authors: Your Name
:date: ${3:2015-03-01}
:tags: ${4:Tags}
:slug: ${5:slug}

${6:Starting typing content here...}
    ]]></content>
    <!-- Optional: Set a tabTrigger to define how to trigger the snippet -->
    <tabTrigger>title</tabTrigger>
    <!-- Optional: Set a scope to limit where the snippet will trigger -->
    <scope>text.restructuredtext</scope>
</snippet>
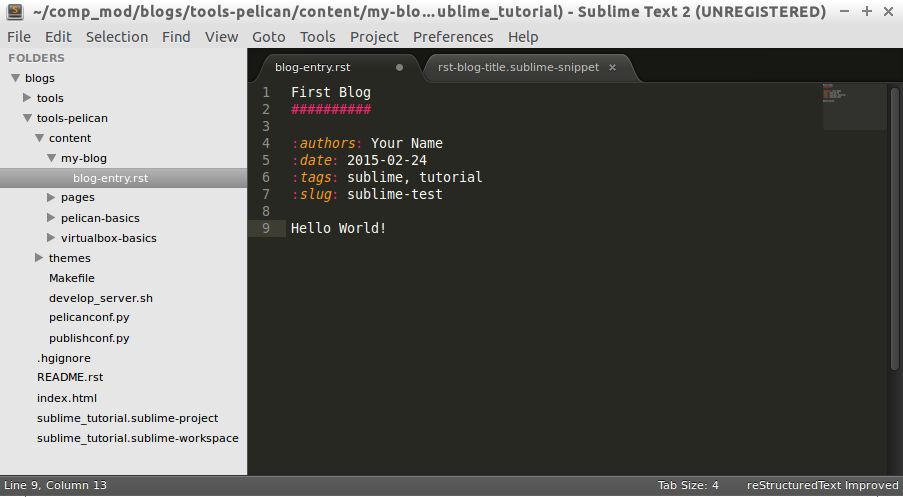
Now we just need to save it by selecting File > Save as or by pressing ctrl + shift +s . The snippet needs to be saved under ~ > .config > sublime-text-2 > Packages > User (ST2 should open the "Save" window in this directory by default) and must have the extension .sublime-snippet. We suggest saving it as a sensible name such as rst-blog-title.sublime-snippet .
Now that it is saved it should work straight away. Navigate back to your .rst file and type in title followed by hitting tab . The snippet should paste all the metadata into your file and allow you to tab through each field and let you update them. Fill in all these fields and add some content such as the classic "Hello World!" Finally, save this file for use in the next section.
Build Systems
ST2 gives you the option to "build" the file you are working on (e.g. if you were working on a .c file you can run a C build system to compile the code and even run it). There are several build systems that come with ST2 such as C++ and python. However, we want to show you how you can make your own personal build system.
Sticking with the blogging theme, we are going to create a build system that allows you to generate the .html files and a "Run" option to locally view the index.html files in a browser.
Firstly, we need to create a new build system, so go to Tools > Build System > New Build System... which will open a new file. Like many other ST2 settings files, build systems are written in Java Script Object Notation (JSON) format, requiring key word and argument pairs. The default new build system should look like this:
{
    "cmd": ["make"]
}
In here we will place our commands that we would normally type as a bash command. To start we need to give a command to navigate to where the Makefile is and then use it. The most robust way to do this is to start from a known point i.e. your home. In the case of the virtual appliance we have supplied, the path will be ~/comp_mod/blogs/tools-pelican. Then we can add the command make html as shown below. It is also good to add a selector field that means this build system only works on specific file types and will be automatically selected by ST2 (in this case we want it to work on text.restructuredtext files).
{
    "cmd": ["bash", "-c", "cd ~/comp_mod/blogs/tools-pelican && make html"],
    "selector": "text.restructuredtext"
}
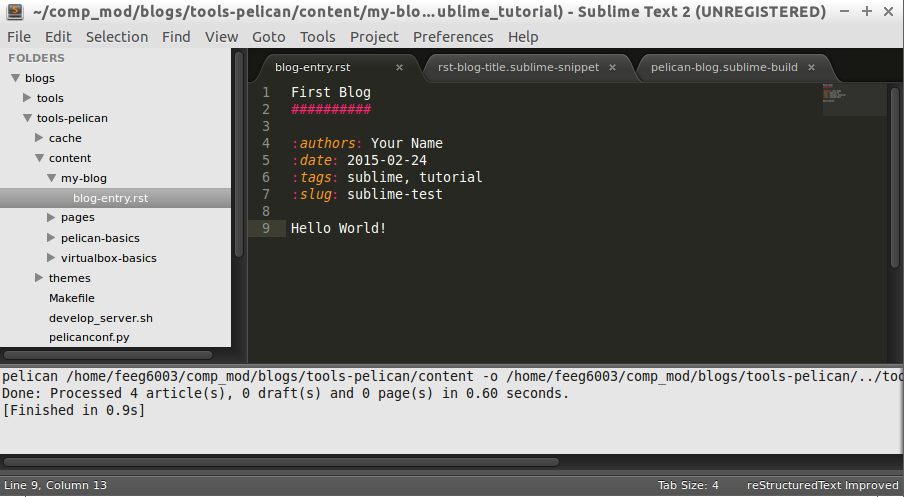
If we now save this in the user directory ~/.config/Sublime Text 2/Packages/User``as ``pelican-blog.sublime-build (again the extension .sublime-build is required) and then return to editing to the blog-entry.rst file that was created above and we can use this build system. To use the build system either go to Tools > Build System and select the pelican-blog system, or alternatively, press ctrl + b . Upon doing this the bash output of the commands will be displayed at the bottom of the screen as shown in Figure 9.
To add the option (or a variant) of viewing the output once you have built it you can update the build system as follows:
{
    "cmd": ["bash", "-c", "cd ~/comp_mod/blogs/tools-pelican && make html"],
    "selector": "text.restructuredtext",

    "variants":
    [
        {
            "name": "Run",
            "cmd": ["bash", "-c", "cd ~/comp_mod/blogs/tools-pelican && make html && cd ~/comp_mod/blogs/tools && firefox index.html"]
        }
    ]
}
This variant is called "Run" and carries out the same commands as "Build" but also opens the local index.html in a firefox browser. The name "Run" was chosen as it comes with the predefined key-binding ctrl + shift + b and an option in the Tools drop down menu. You can add multiple variants to perform other tasks, however, they won't be available in to drop down menu; instead you can find them in the Command Palette ( ctrl + shift + p ) and search for Build: <variant name>, or add a personal key-binding under Preferences > Key Bindings - User (again in the JSON format: see Key Bindings - Default for the format).

Additional Exercises
As an extra challenge, we have provided a problem you may like to try to practise personalising ST2:
- Create an ANSI-C build system with flags -ansi -pedantic -Wall (as used in FEEG6002 - Advanced Computational Methods 1)
- Write hello.c to print "Hello World" to stdout (for example)
- Use the C build-system to compile hello.c program and run/display output to console
- Add a new variant called "save_output" in the build system to pipe the stdout feed to output.txt or a similar output log file
- Add a keybind to the save_output build variant (see default keybindings for "variant": "Run")
- Check your output file in sublime
We also suggest looking at using ST2 for building LaTeX documents by following these rough steps (aimed at Linux systems):
- If you haven't already, install a tex-live distribution, latexmk and evince reader through the terminal (i.e. using apt-get)
- Download, via Package Control, the package "LaTeXTools"
- Got to Preferences > Package Settings > LaTeXTools and click on Reconfigure LaTeXTools and migrate settings.
- Create a minimal .tex file the compile using LaTeXTools (i.e. ctrl + b ).